

One Point of Contact: Home Renovation Checklist for Homeowners


Start by defining the scope, setting a realistic budget range with contingency, and checking whether your project needs building consent. Most renovations run late or over budget because these three things get decided on the fly instead of upfront. This home renovation checklist covers the full sequence: planning, budgeting, consent, hiring trades, room-by-room specifications, the construction phase, and final sign-off.
TL;DR:
Clearly defining project scope, priorities, and budget upfront prevents delays and prevents quotes from becoming inconsistent or misleading.
Most structural, plumbing, and electrical changes require a building consent, so verifying requirements before contracting trades is essential.
Hiring licensed, insured tradespeople with verified references and clear variation processes minimizes disputes and ensures quality work.
Project management that coordinates trades, stages procurements, and documents changes in writing significantly reduces the risk of delays and costly errors.
Table of Contents
Planning and defining the project: scope, priorities and timeline
Budgeting and finance checklist: cost items, contingency and payment structure
Permits, consents and compliance: do you need a building consent?
Hiring, contracts and managing trades: checks, contracts and variations
Room-by-room checklist: kitchen, bathroom, living, bedroom, laundry and exterior
Construction phase checklist: site prep, safety and inspections
What actually separates a smooth renovation from a stressful one
Planning and defining the project: scope, priorities and timeline
Before anyone picks up a tool, you need a decision on paper: what’s being renovated, what “finished” looks like, and what you’re not willing to compromise on. Skipping this step is the single biggest reason renovations blow out. Quotes get compared apples to oranges when the brief keeps shifting, and trades end up guessing at what you actually want.
Start by sorting every item on your wish list into must-have and nice-to-have. A new kitchen layout that fixes a genuine workflow problem is a must-have. Matte black tapware because it looked good on a renovation show is a nice-to-have, and it’s the first thing to cut if quotes come in high.
From there, write a short project brief covering:
Scope: which rooms or systems are changing, and which are staying untouched
Outcome: what success looks like when the last trade leaves
Constraints: your budget ceiling, move-out dates, and any structural limits
Key decisions: layout, materials, and who has final say on changes
Decide early who’s managing the project. A full-service manager who coordinates consent, trades and scheduling under one contract removes the coordination burden from your shoulders, which matters most on multi-trade jobs like kitchens and bathrooms.
Pro Tip: Write your project brief before contacting a single tradie. Every quote you get afterwards should respond to that same document, not a verbal description that changes with each phone call.
Budgeting and finance checklist: cost items, contingency and payment structure
Your budget needs to account for more than the trade quotes you collect. A realistic renovation budget covers:
Design and drawings
Building consent fees
Labour across all trades
Materials and fixtures
Appliances
Provisional sums for unknowns (like what’s behind an old wall)
Contingency
That last line item is the one homeowners consistently underestimate. Build in a contingency of a modest percentage of the total build cost, and treat it as untouchable until something genuinely unexpected turns up, not as extra spending money for upgrades you decide on halfway through.
Payments should be staged and tied to actual progress, not calendar dates. A typical structure ties payments to milestones such as consent approval, framing completion, and final inspection, so you’re never paying substantially ahead of the work delivered. This also gives you leverage if quality slips, because you can hold the next payment until it’s fixed.
Cost overruns are rarely caused by one big mistake. They’re usually the result of undocumented variations stacking up over the course of a job. Consumer NZ’s guidance on the building process points to clear documentation and formal variation tracking as the key control that keeps budgets on track. If you want a firmer sense of what your specific project should cost before you start collecting quotes, a renovation cost calculator gives you a benchmark to test quotes against.
Permits, consents and compliance: do you need a building consent?
Most structural changes, extensions, and major plumbing or electrical work require a building consent. Cosmetic work like repainting, replacing carpet, or swapping a kitchen bench without moving services usually doesn’t. The line between the two isn’t always obvious, which is why guessing is a costly habit.
The fastest way to check is the Can I Build It tool, which walks through your specific work and tells you whether consent applies. If the answer is unclear, contact your local Building Consent Authority (BCA) directly before booking any trades.
Work type | Consent typically required? |
Moving load-bearing walls | Yes |
Kitchen or bathroom relayout with new plumbing | Yes |
Room additions or extensions | Yes |
Repainting or re-carpeting | Usually not |
Replacing like-for-like fixtures | Usually not |
Once you apply, the statutory processing window is 20 working days, but that clock stops the moment the BCA sends a Request for Information (RFI) and doesn’t restart until you respond. A well-organised application using the standard order of documents reduces the odds of an RFI in the first place.
Confirm consent requirements before finalising any trade contracts
Keep copies of every drawing, specification and approval
Expect scheduled inspections at key construction stages, all of which feed into your eventual Code Compliance Certificate
Hiring, contracts and managing trades: checks, contracts and variations
The quality of your renovation depends more on who you hire than on any material choice. Before signing anything, verify:
Licensing: for restricted building work, confirm the tradesperson is a Licensed Building Practitioner (LBP) in the relevant class.
Insurance: ask for proof of current public liability cover.
References: speak to at least two recent clients, ideally with a similar scope of work.
Past work: ask to see finished jobs in person where possible, not just photos.
Your contract should spell out scope, deliverables, payment milestones, warranty terms, and, critically, the process for handling variations. This last point is where most disputes originate. Any change to scope during construction needs to be documented and priced in writing before the work proceeds, not agreed to verbally and settled later. If a variation affects work already covered by your building consent, it may need a consent amendment too.
Set a communication routine from day one: regular site meetings, dated photos of progress, and one nominated person with authority to approve changes. Without that single point of contact, decisions get made twice by two different people, and that’s expensive.
Pro Tip: Ask every trade for a written quote breakdown, not a lump sum. A single “$14,000 for bathroom labour” line tells you nothing if a dispute arises later over what was actually included.
Room-by-room checklist: kitchen, bathroom, living, bedroom, laundry and exterior
Every room has its own list of decisions that need locking in before demolition starts, because once walls are open, delays waiting on your choices cost real money in idle trade time.
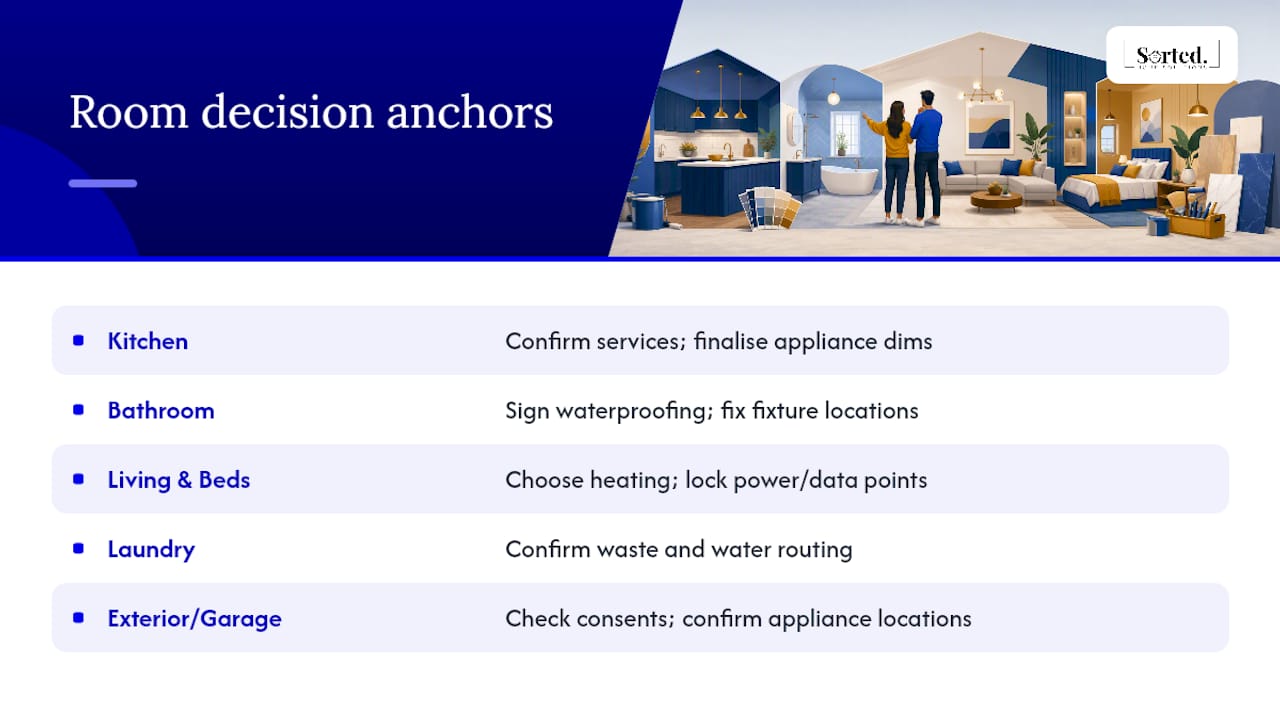
Kitchen: Confirm service locations for plumbing, gas and power before cabinetry is ordered. Decide bench height and layout around how you actually cook, not a showroom display. Appliance dimensions must be finalised before cabinetry is built, since a fridge that’s 20mm too wide can hold up an entire install.
Bathroom: Waterproofing specification isn’t optional, and it needs to be signed off before tiling begins. Fix fixture locations early, particularly where a toilet or shower is moving, since that changes drainage falls. Confirm extraction fan capacity for the room size to manage moisture long term.
Living areas and bedrooms: Decide heating type (heat pump, ducted, or fixed heaters) before wall linings go up, since wiring and ducting need to be roughed in first. Lock in data and power point locations for how you’ll actually use the room, not just where furniture sits today. Flooring choices affect subfloor prep, so decide before framing inspections.
Laundry, exterior and garage: Confirm waste and water routing for laundry appliances early. Exterior work often needs separate consent consideration, so check this alongside your main project. Storage and shelving are easy to defer, but appliance locations aren’t.
As a general rule, order anything with a long lead time (custom cabinetry, imported tiles, specific appliances) before demolition starts, and leave soft-finish decisions like paint colours and hardware for later in the build. If you want a sense of realistic sequencing for the biggest rooms, both the kitchen renovation timeline and bathroom renovation timeline lay out what happens week by week.
Construction phase checklist: site prep, safety and inspections
Once work starts, your job shifts from decision-making to protecting the site and keeping inspections on schedule.
Secure the site: temporary fencing, dust barriers, and protection for landscaping or items you’re keeping.
Handle waste properly: arrange skip bins for general waste, and if the home was built before the 2000s, check for asbestos before any demolition disturbs old linings or floor coverings.
Book inspections early: structural, plumbing and electrical rough-in inspections all need to happen at specific build stages. A missed booking can delay the entire schedule by weeks, not days.
Track progress with photos: regular dated photos of deliveries, site conditions and completed stages give you a record if a dispute or inspection query comes up later.
Demolition and structural work are the noisiest, messiest phases, but they’re also where problems hiding behind old walls get found. Budget both time and contingency for surprises here.
Finishing, snagging and completion checklist
Before final payment, walk the whole property and build a written defects list, known as snagging, covering everything from paint touch ups to sticking doors. Collect every piece of documentation as you go:
Records of work from each Licensed Building Practitioner
Product data sheets and warranties for appliances and fixtures
Energy or insulation certificates where applicable
Once the work is complete, lodge for your Code Compliance Certificate promptly. If no application is made, councils have to decide whether to grant or refuse the CCC 24 months after consent was originally granted, which can leave you in limbo on resale.
Pro Tip: Buyers’ solicitors check for a CCC on consented work almost every time. A missing certificate can stall or kill a sale years after your renovation is finished.
What actually separates a smooth renovation from a stressful one
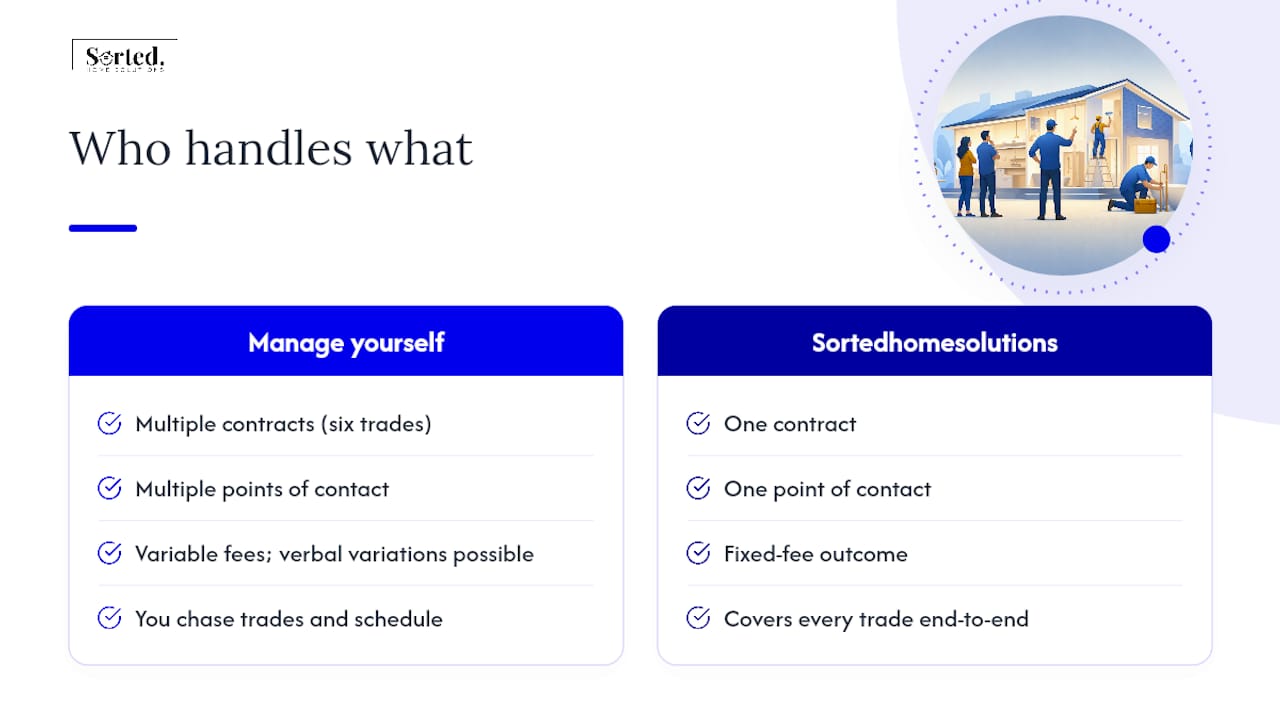
Most renovation advice focuses on picking the right tapware or the right tiler. The bigger risk sits in the gaps between trades: the plumber waiting on the electrician, the tiler waiting on a decision nobody made yet. Sortedhomesolutions’ approach treats project management as the deliverable, not an afterthought bundled into a trade’s quote.
That looks like one point of contact across the whole job, staged procurement so materials arrive when they’re needed rather than sitting on-site or holding up work, and a decision log that captures every variation in writing before it’s actioned. It’s the same discipline Consumer NZ recommends for avoiding disputes, applied consistently rather than left to chance. The homeowners who avoid blowouts aren’t the ones who chose better trades. They’re the ones who chose better coordination.
— Rudi
How Sortedhomesolutions takes the checklist off your plate
Running this whole checklist yourself is doable, but it’s a part-time job on top of your actual one. Sortedhomesolutions is the alternative to juggling six separate trades and a spreadsheet of variations: one contract, one point of contact, and a fixed-fee outcome that covers project management, consenting and every trade from demolition to final sign-off.

That means no chasing an electrician who’s waiting on a plumber, no guessing whether your extension needs consent, and no verbal variations that turn into disputes later. Sortedhomesolutions manages the building consent process alongside the build itself, so the two never fall out of sync. If your kitchen or bathroom project fits within a known scope, the pricing page shows package costs upfront rather than making you wait weeks for a quote.
For anything bigger, start with the Full Home Reno service page and request a fixed-fee estimate before you commit to a scope. It’s the fastest way to find out what your project actually costs, with the coordination already built in.
Official guides and helpful resources for homeowners
Before starting, check consent rules on Can I Build It, review the step-by-step process on Building.govt.nz, and read Consumer NZ’s renovation guidance for dispute-avoidance practices. Your local council remains the final word on consent requirements for your specific address.
Sources
Recommended
Comments