

Renovation Dust Control: 5 Day One Containment Steps for NZ Homes

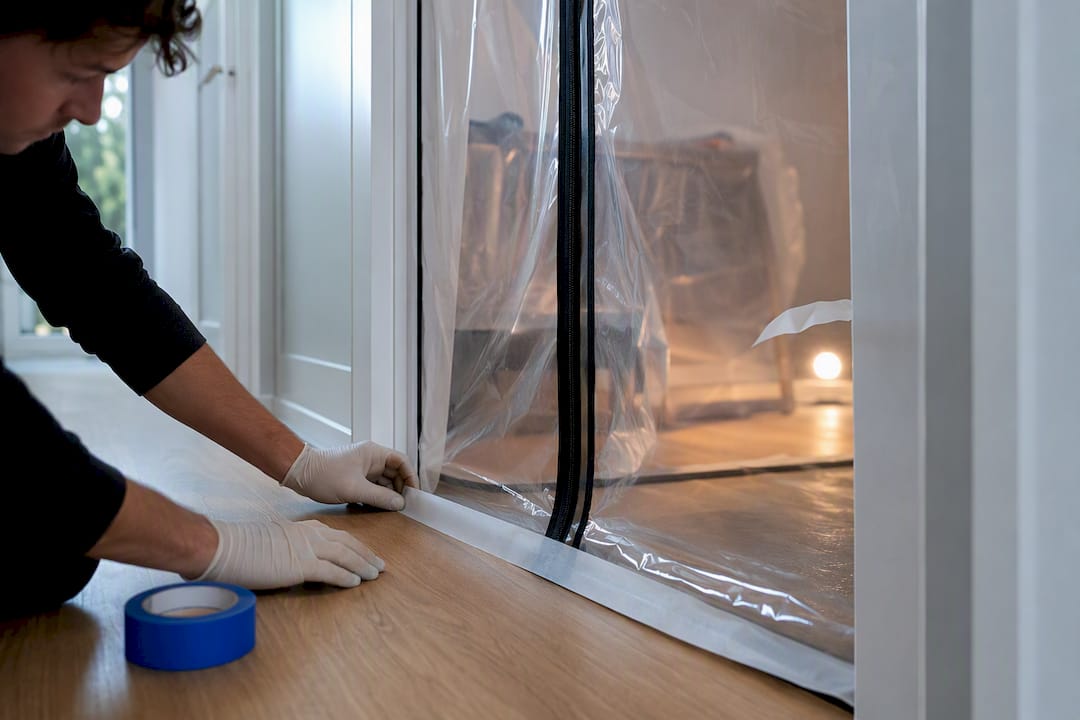
Contain dust at the source before it spreads. Seal the work zone with a barrier, run negative exhaust so air pulls inward, and use on-tool extraction or wet cutting instead of dry methods wherever possible. Hazardous dust from pre-1990 materials needs an H-class or HEPA vacuum, not a domestic one. If you suspect asbestos or lead paint, stop work and arrange a professional survey before anything is disturbed.
TL;DR:
Sealing the work zone with proper barriers and verifying negative pressure ensures dust does not escape into living areas during renovation.
Closing and covering HVAC vents with plastic, switching off systems, and fitting high-efficiency filters reduce the spread of fine dust particles throughout the house.
Using on-tool extraction, wet cutting, and H-class vacuums directly controls dust at its source, especially when dealing with hazardous materials like asbestos or lead paint.
Conducting a professional survey before demolition and following strict asbestos and lead paint handling procedures minimize health risks from older materials.
Daily cleaning with damp methods and a site-specific dust management plan prevent dust accumulation and contain hazards throughout all renovation stages.
Table of Contents
Dust control renovation checklist for day one
Before a single wall comes down, get these five things in place. They cost little, take an afternoon, and prevent weeks of dust migrating through the rest of your home.
Seal the work zone. Define the boundary with plastic sheeting and create one controlled crossing point, taping thresholds so dust can’t drift under doors.
Shut down the HVAC in that area. Close and cover registers; if the system serves the whole house, consider a temporary negative exhaust fan instead of running it as normal.
Line up extraction gear. Hire on-tool extraction for saws and sanders, set up wet cutting for tile or masonry, and have an H-class or HEPA vacuum on site before demolition starts.
Protect what you’re keeping and set a cleaning rhythm. Move or cover furnishings, then schedule damp-cleaning daily, not weekly, and brief every trade on entry and exit hygiene.
Check the age of the building. If any materials were installed before the 1990s, arrange a refurbishment or demolition asbestos survey before demolition begins.
Pro Tip: Walk the site each morning before trades arrive and check the barrier seams, tape, and exhaust fan are still doing their job. A five-minute check catches a torn sheet before a full day’s dust gets through it.
How do you build containment that actually holds dust back?
A garbage bag taped to a door frame is not containment. Real dust control during renovation means a barrier rated for the job, sealed properly, and checked for airflow.
For plastic sheeting, thin film is fine for light dust like painting prep, but demolition and sanding call for thicker fire-retardant sheeting, taped with overlapping seams rather than a single strip down the middle. Where you’re sealing a wide opening such as a hallway or open-plan living area, a site-built temporary wall gives far better results than sheeting alone: furring strips top and bottom hold tensioned plastic taut, so it doesn’t billow every time a door opens elsewhere in the house.
Access is where most containment fails in practice:
Zipper doors let trades pass through without peeling back tape each trip, which cuts tears and gaps.
A self-closing slit works for light foot traffic but isn’t durable enough for a full workday of trades.
A controlled crossing point, ideally with a sticky mat or a boot-change station, stops dust hitching a ride on soles.
Once the barrier’s up, verify it’s actually working rather than assuming it is. A negative pressure setup, using an exhaust fan or a window fan pulling air out of the work zone, draws air inward through any gaps instead of pushing dust out into living areas. A quick smoke test confirms it: hold a lit incense stick near the edge of the barrier, and if the smoke drifts toward the work zone, the pressure differential is doing its job. If it drifts outward, you’ve got a leak worth chasing down before work resumes.
Pro Tip: Tape a strip of tissue paper to the barrier edge instead of using incense repeatedly. If it flutters inward, your negative pressure is holding.
Should you close your HVAC vents during renovation?
Yes, in almost every case. HVAC systems are one of the most efficient ways dust spreads through a house during renovation, pulling fine particles into ductwork and redistributing them to rooms nowhere near the actual work.
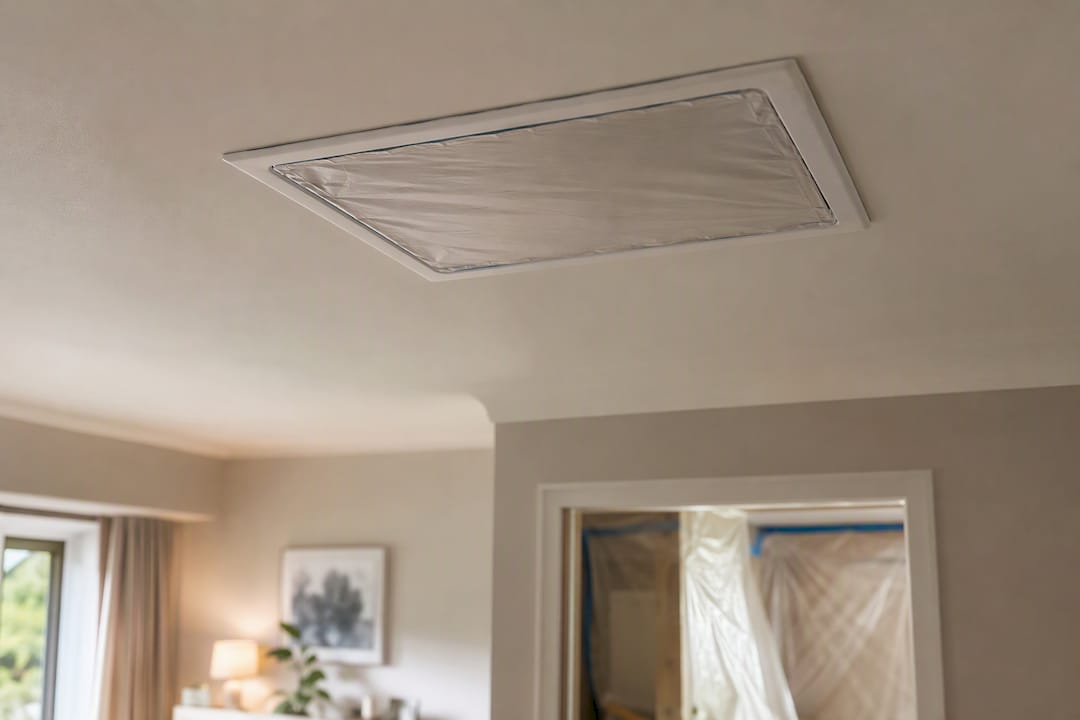
Close and physically cover supply and return registers in the work zone with plastic and tape, not just the louvres shut. If the system serves multiple zones from one central unit, switch it off entirely for the duration of demolition and heavy sanding rather than risk drawing dust through shared ductwork.
A few filter habits make a measurable difference:
Fit a higher-efficiency filter (MERV 11 to 13 where your system allows it) for the duration of the works.
Replace filters more often than usual. Renovation dust clogs a filter far faster than daily household use.
If you’re running a temporary exhaust fan for negative pressure, position it to draw air out of the work zone and toward the outside, not back into shared indoor space.
Once demolition and rough work are finished, book a full HVAC service and fit a fresh filter before returning the system to normal use.
What tools remove dust at the source instead of spreading it?
The most effective dust control happens before dust becomes airborne, not after. This is the engineering-controls layer in WorkSafe’s hierarchy of controls, which ranks elimination and engineering controls well above relying on masks or ventilation alone.
On-tool extraction (LEV) attaches a vacuum shroud directly to a saw, sander, or grinder, capturing dust at the blade rather than letting it plume into the room. When hiring tools, ask specifically for extraction-fitted equipment, not just the tool itself.
Wet cutting suppresses dust at tile, concrete, and stone cuts by keeping the cutting edge damp. Keep water away from power leads and switches, and use a dedicated wet-cutting saw rather than improvising with a hose on a dry-rated tool.
H-class vacuums are non-negotiable for asbestos or high-silica dust. Domestic and standard shop vacuums aren’t built for this hazard class, because their filtration lets the smallest, most dangerous particles straight through.
Maintenance matters as much as the gear. Check pre-filters daily, back-flush as recommended, and empty or bag dust-containing waste before it overflows rather than after.
Documented case work backs this up: combining wet cutting with better ventilation and on-tool extraction has brought airborne exposures below workplace exposure standards when the controls are applied correctly and checked, not just installed and forgotten.
What should you do if you suspect asbestos or lead paint?
Stop. That’s the entire first step, and it applies the moment you notice materials that look older than the 1990s, whether that’s old vinyl flooring, textured ceilings, fibre cement sheeting, or painted trim in a pre 1980s home.
Refurbishment and demolition surveys exist precisely because you can’t reliably tell asbestos-containing material from ordinary building product by looking at it. WorkSafe’s guidance is unambiguous: get a professional survey before any demolition or refurbishment work begins on a building where materials predate 1990.
Once a survey confirms a risk, the rules tighten considerably. Standard power tools like angle grinders and orbital sanders are off the table on asbestos-containing material, because they generate exactly the fine, aerosolised fibres that cause the most harm. Materials need to stay damp rather than dry, and any vacuum used on site has to be H-class rated, never a household or trade vacuum pulled off the shelf.
A few practical rules to hold trades and yourself to:
Licensed removal is required for higher-risk asbestos work; an occupational hygienist may need to sign off clearance testing before the area is reopened.
Never dry sweep suspected asbestos or lead dust, and never run it through a domestic vacuum.
Decontaminate tools and PPE on site rather than carrying dust through the rest of the house.
Bag and seal waste according to local disposal rules rather than putting it in general rubbish.
If you’re renovating an older Auckland home, our guide on checking for asbestos before you renovate walks through the warning signs room by room, and our lead paint removal guide covers what actually protects your family versus what just sounds like it does.
What’s the right cleaning routine during and after renovation?
Cleaning during a renovation isn’t a once-a-week tidy up. It’s a daily discipline that decides whether dust stays contained or ends up in your bedding.
Damp-wipe high surfaces first, then move to floors and fabrics with an H-class or HEPA vacuum. Dry dusting or sweeping just re-suspends fine particles into the air you’re breathing.
Treat the crossing point as a hygiene checkpoint. Shoes off, tools wiped down, and dusty work clothes bagged separately rather than carried through the house.
Bag and seal waste properly. Sitesafe’s guidance is direct on this: never wash dust down drains or gutters, since it just relocates the problem outdoors.
Run a proper final check before reopening a room. A top-to-bottom wipe, a visual inspection under good light, and a vacuum filtration check confirm the space is actually clean, not just clean-looking.
Pro Tip: Keep a simple daily log of what was cleaned and when. It sounds fussy, but it’s the fastest way to catch a slipping routine before dust builds up somewhere you can’t see.
How much dust control do you need at each renovation stage?
Dust volume changes dramatically by phase, and matching your controls to the actual stage saves both money and unnecessary disruption. Homeowners often overprotect the finishing stage and underprotect demolition, when it should be the reverse.
Demolition generates the heaviest dust load by far. Full containment, negative air, H-class vacuums, and professional oversight if hazardous materials are suspected are all justified here.
First fix (framing, rough plumbing, rough electrical) still produces plenty of dust from cutting and drilling. Keep on-tool extraction running and vacuum frequently rather than waiting for visible buildup.
Second fix and finishing (painting, trim, fixtures) let you scale back. Barriers can shrink, extraction demand drops, but the daily cleaning discipline should stay exactly as strict.
Living-in strategy: high-dust stages typically run from a few days to a couple of weeks depending on scope, so plan which rooms you’ll close off entirely versus which you can keep using with basic protection.
Why a managed, all-trades team lowers your dust risk
Coordinating containment, extraction, and hazardous material checks across multiple trades is where most DIY dust plans quietly fall apart. One trade seals a doorway properly; the next one props it open for a delivery and undoes an afternoon’s work.
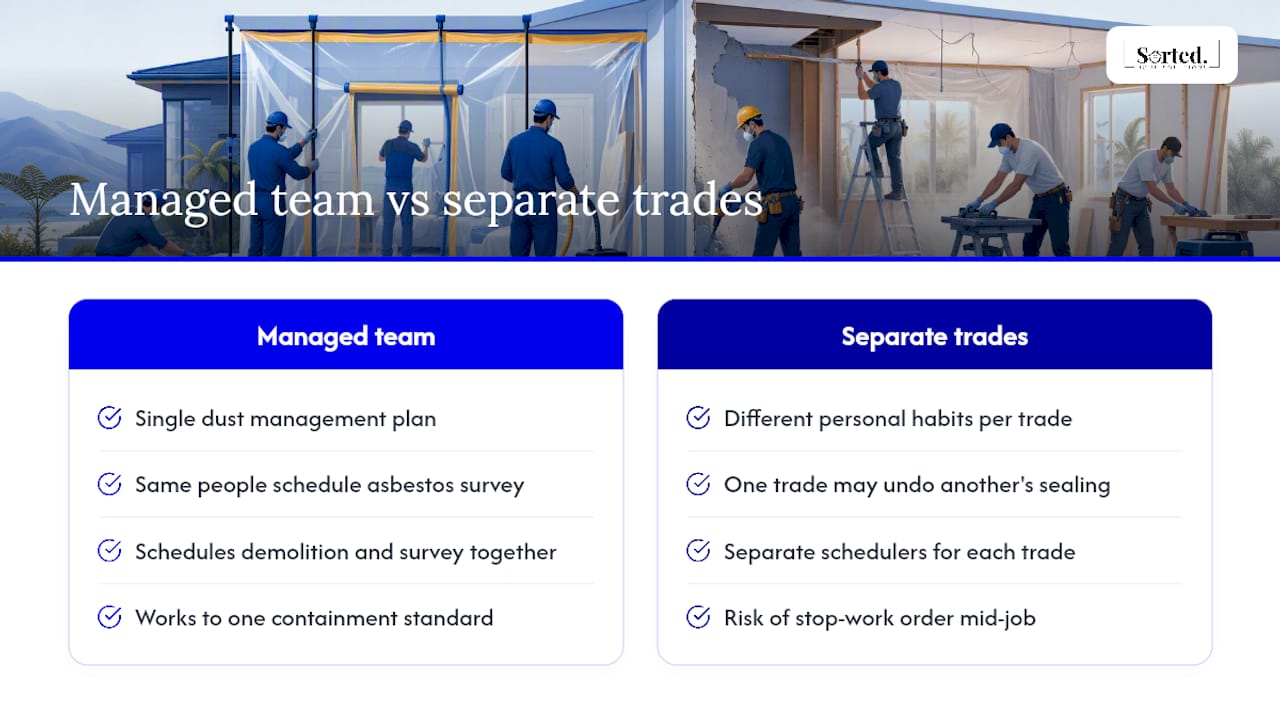
An all-trades team working from a single dust management plan avoids that gap, because the same people scheduling the asbestos survey are scheduling the demolition crew, and everyone’s working to the same containment standard rather than five different personal habits. That coordination matters most when the job involves complex demolition, suspected hazardous materials, or a tight schedule where you can’t afford a stop-work order halfway through. It’s less critical for a straightforward paint refresh with no structural work involved.
If you’re weighing up whether to run trades yourself or hand the whole thing to one team, our guide on choosing a renovation company in Auckland sets out the questions worth asking before you sign anything.
— Rudi
Get a dust management plan built into your renovation quote
A professional renovation company manages the whole renovation, so dust control isn’t left to whichever trade happens to be on site that day. Asbestos surveys, containment, extraction, and cleaning schedules get coordinated as part of one project plan rather than handled piecemeal across separate contractors.

If your home has materials installed before the 1990s, mention it when you enquire so the survey step gets scheduled before any demolition date is locked in. It’s worth asking directly about dust management plan experience when you compare options, since not every provider builds one in as standard. You can see how full projects come together in our gallery of completed renovations, or go straight to requesting a quote for your full renovation and get a dust plan built into the scope from day one.
Where to check the official dust and asbestos guidance
For the regulatory detail behind these steps, go to the primary sources. WorkSafe’s dust guidance covers the hierarchy of controls in full, while the Ministry for the Environment’s good practice guide sets out dust management plan basics. Sitesafe offers practical, site-level advice worth bookmarking.
Sources
Recommended
Comments