

Consent First for Open Plan Kitchen Conversions in Auckland


An open plan kitchen conversion removes the wall between kitchen and living or dining space, but the single question that decides everything else is whether that wall carries load. Get an assessment from a Licensed Building Practitioner before you plan colours or islands. That one check determines whether you need building consent, how much the work costs, and how long you’ll be living with plastic sheeting over your furniture.
TL;DR:
Most interior walls in Auckland homes are load-bearing or serve as bracing, so professional assessment is essential before removal.
Costs vary significantly depending on whether the wall is structural, with structural removals often exceeding $30,000, including design, consent, and construction.
Building consent is required if the wall carries load, involves masonry, or touches fire separation, while non-load-bearing walls may qualify for exemptions.
Proper planning for noise, odour, storage, and mess is crucial, with solutions like ducted extraction, soft finishes, and a butler’s pantry mitigating common downsides.
Hiring a fixed-team that manages design, consent, and trades simplifies the process and helps contain costs and timelines.
Table of Contents
What is an open plan kitchen conversion?
An open plan kitchen conversion turns a closed, separate kitchen into one continuous space shared with the living or dining area, usually by removing or partially removing an internal wall. Most Auckland homeowners chasing this want more natural light, better sightlines to kids or guests, and a kitchen that doesn’t feel cut off from the rest of the house while cooking.
The benefits of open kitchens are real and well documented by anyone who has lived in both layouts. A knocked-through kitchen feels bigger even when the floor area hasn’t changed, because sightlines stretch across two or three rooms instead of stopping at a doorway. Cooking stops being a solitary chore and becomes part of whatever is happening in the lounge. Resale agents in Auckland routinely point to open concept kitchen remodels as one of the renovations buyers ask for by name.
The trade-offs get less airtime than the upsides, and they matter just as much when you’re weighing open plan vs closed kitchen layouts:
Noise carries. A blender or extractor fan that was once muffled by a door is now audible from the couch.
Cooking odours travel into soft furnishings and curtains in the living area, especially without proper extraction.
Storage shrinks. A closed kitchen’s walls often hide pantry space that open plan layouts have to find elsewhere.
Mess is on display. Dishes and clutter are now visible to anyone in the living space, not just kitchen visitors.
None of these are reasons to avoid the conversion. They’re reasons to design around them deliberately, which is exactly what the next sections cover. A butler’s pantry, ducted extraction, and a slightly oversized island bench solve most of the list before it becomes a problem.
How do you convert a kitchen to open plan?
Converting a kitchen to open plan starts with an assessment, not a sledgehammer. Here’s the sequence that actually works, in the order it needs to happen.
An LBP or structural engineer needs to look at more than the wall itself. A quick visual check tells you almost nothing useful, because load paths in New Zealand homes often run through framing you can’t see from the room. In plenty of Auckland bungalows, the roof and ceiling runner configuration means an internal wall that looks purely cosmetic is actually carrying a share of the roof or bracing load, and only someone on site with the right training can confirm that either way.
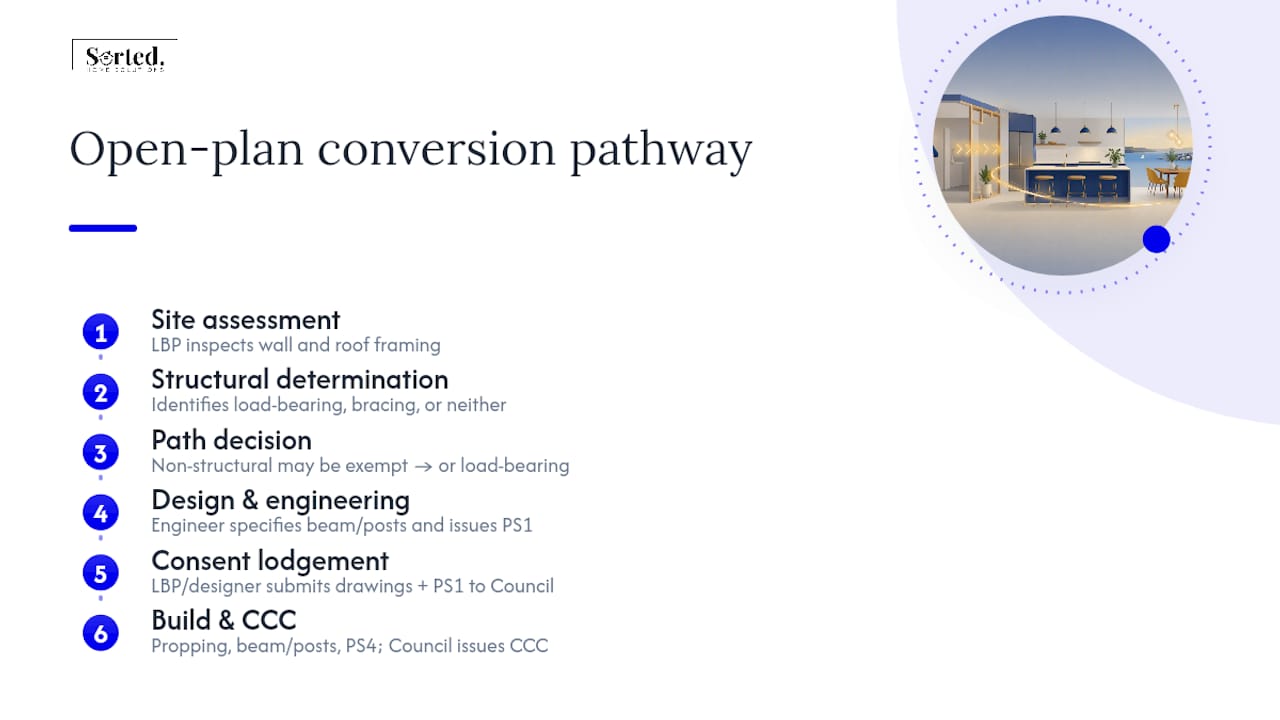
1. Site assessment. An LBP inspects the wall, checks roof framing above it, and identifies whether it’s load-bearing, a bracing element, or neither.
2. Structural determination. If the wall is non-load-bearing and not a bracing panel, you’re generally on the simplest path. If it’s load-bearing, you need a beam, posts, and an engineer’s design to redistribute that load safely.
3. Consent check. Removing a section of an internal timber-framed wall that isn’t load-bearing and isn’t a bracing element may not require a building consent under Schedule 1. But those exemptions exclude work that touches primary structure, specified systems, fire separation walls, or masonry — any of which pushes you into consented territory.
4. Design and engineering. For load-bearing removals, a structural engineer specifies the replacement beam, posts, and any temporary propping needed during construction, and issues a Producer Statement (PS1) confirming the design meets the Building Code.
5. Consent lodgement (if required). Your LBP or designer submits drawings and the engineer’s PS1 to Auckland Council, who assess against the Building Code before issuing consent.
6. Build. Propping goes in first, the wall comes out, the beam and posts go in, and the licensed builder finishes framing, plastering, and structural sign-off (PS4).
7. Code Compliance Certificate (CCC). Council inspects the completed work and issues the CCC, which closes out the consent and matters enormously when you sell the house later.
Pro Tip: Book your LBP structural check before you get quotes from anyone else. A ten-minute site visit that costs a few hundred dollars can save you from redesigning your entire layout around a beam nobody budgeted for.
Most homes with a straightforward internal wall removal end up on what local designers call Pathway C, meaning an LBP designer and a structural engineer are both required, and the project goes through full consent. That’s not a bad outcome. It just means you plan for it from day one instead of discovering it halfway through demolition.
What design rules matter for an open plan kitchen?
Layout numbers that seemed irrelevant in a closed kitchen become the whole game once walls disappear, because everyone walking through your living space now walks through your kitchen too.
The work triangle, the classic distance between sink, stove, and fridge, still holds up as a planning tool. Design guidance generally recommends keeping the total triangle between roughly 3.7 and 7 metres, with a minimum aisle width of 900mm and a more comfortable 1,200mm where two people might pass each other or where the aisle doubles as a walkway for the rest of the house.
Statistic to remember: an open plan layout needs those aisle widths applied more generously than a closed kitchen, because foot traffic from the living and dining areas now cuts through zones that used to be private.
Islands are the feature everyone wants and the one most likely to blow the budget if you’re not careful. An island with a sink or cooktop means relocating plumbing and often gas or additional electrical circuits, which is a bigger job than moving a bench. An island without wet services is far cheaper and still delivers the zoning benefit, letting you divide “kitchen” from “living” without a wall.
A few design moves consistently solve the downsides raised earlier:
Zoning with materials, not walls. A change in flooring, a lowered ceiling section, or a different pendant light signals “kitchen zone” without blocking sightlines.
Ducted extraction, not recirculating. Building Code expectations generally require mechanical extraction ducted to the outside for a cooktop; a recirculating rangehood that just filters and blows air back into the room often won’t cut it for odour or moisture control in an open space.
A butler’s pantry hides mess and small appliances from the living area while keeping the main kitchen open.
Soft finishes — rugs, upholstered dining chairs, acoustic ceiling panels — absorb noise that hard open-plan surfaces would otherwise bounce straight into the lounge.
Keeping the sink and stove near their original positions where the layout allows is one of the more underrated moves in an open concept kitchen remodel. It captures most of the openness with a fraction of the plumbing cost.
How much does an open plan kitchen conversion cost?
Cost swings mostly on one variable: whether the wall is structural. That single fact separates a modest weekend-adjacent job from a $30,000 to $40,000 undertaking, so it’s worth nailing down before you get attached to a number.
The main cost drivers, roughly in order of impact:
Structural work. A beam, posts, temporary propping, and engineering design cost far more than a non-structural wall removal, and they trigger consent fees on top.
Plumbing and electrical relocation. Moving a sink to an island, or shifting power points and lighting circuits to suit the new layout, adds trade time and materials that a straight wall demolition doesn’t.
Ventilation. Ducting a rangehood to the exterior, especially through a two-storey section or a hip roof, can be a bigger line item than homeowners expect.
Finishes. Matching flooring across the old wall line, replastering ceilings, and repainting the combined space all add up once the structural work is done.
Professional fees. LBP design, engineer’s PS1, and council consent fees are fixed costs regardless of how simple the actual demolition is.
For a straightforward, non-structural wall removal with no consent trigger, costs stay modest and timelines run to a few weeks. For a fully consented structural removal, design fees, council fees, and construction together often land in the tens of thousands, and the process from first LBP visit to CCC can run well beyond that of the exempt path.
Timelines split the same way. Exempt, non-structural work can be done in a matter of weeks once trades are booked. Consented structural projects typically run six to twelve weeks or more once you count design, council processing, and construction sequencing, particularly if council requests further information.
Hidden services are where budgets actually blow out. Wiring, plumbing, and ventilation ducting concealed inside walls and floors often only reveal themselves once demolition starts, and rerouting them, for example running new drainage fall and venting under a floor for a relocated sink, can add unplanned days and dollars. Build in a contingency of at least 10 to 15% for exactly this reason, and treat any quote that doesn’t mention hidden services with suspicion.
What do real open plan kitchen conversions look like?
Two typical Auckland scopes show how differently these projects can run, even when the end result photographs the same way.
Case one: 1970s brick and tile, timber-framed internal wall. The wall between kitchen and dining turned out to be non-load-bearing and carried no bracing rating, confirmed on-site by an LBP. The scope stayed inside Schedule 1 exemptions: no consent required, wall removed, opening finished with a new bulkhead to hide the ceiling junction, and a repositioned pendant light marking the old kitchen boundary. Total build time from LBP sign-off to finished plaster was measured in weeks, not months.
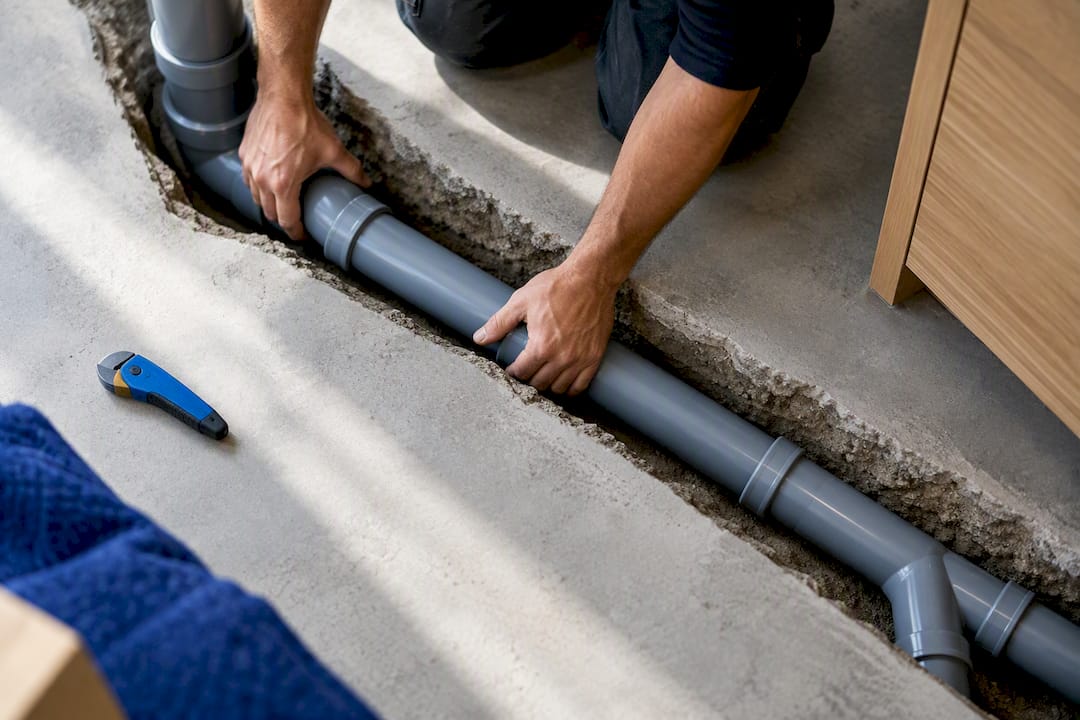
Case two: 1990s home on a concrete slab, load-bearing wall with a relocated sink. The dividing wall carried roof load, requiring an engineer-designed beam and posts plus full consent. The client also wanted the sink moved into a new island, which on a slab meant chasing the concrete for new drainage fall rather than a simple reroute. That single decision extended both the consent scope and the construction timeline compared with keeping the sink in its original position.
In before-and-after photos, the visible change is obvious: a wall gone, an island in its place, better light. What the photos don’t show is the beam hidden above the new bulkhead, the rerouted drainage under the new floor finish, or the PS1 and CCC paperwork that make the finished space legally sound. That’s the part worth asking to see, not just the finished shot. Sorted Home Solutions’ kitchen renovation gallery shows both stages of several Auckland projects side by side.
Who do you need to hire for a kitchen conversion?
You need at minimum an LBP for design and site assessment, a structural engineer if the wall is load-bearing, and licensed trades (builder, plumber, electrician) for the physical work. Depending on scope, a project manager coordinating all of them can be the difference between a six-week job and a six-month one.
Here’s what each professional actually delivers, and why skipping one causes delays later:
1. LBP designer. Confirms load path, drafts the design, and prepares the drawings and documentation council needs for consent, or confirms the work qualifies for a Schedule 1 exemption.
2. Structural engineer. For load-bearing walls, designs the replacement beam and posts, and issues a PS1 confirming the design meets the Building Code. On completion, a PS4 confirms the structural work was built as designed.
3. Licensed builder. Carries out demolition, propping, framing, and finishing, working from the LBP and engineer’s documentation rather than guesswork.
4. Plumber and electrician. Relocate services where the new layout demands it, each certifying their own compliant work.
Before any of them start, ask for: proof of insurance, a written scope that names who manages the consent application, a fixed-fee quote rather than an open-ended estimate, and an honest timeline through to CCC.
Pro Tip: If a trade tells you “no consent needed” without having actually opened up the wall or checked the roof framing above it, treat that as a guess, not an assessment. Get it confirmed in writing by someone qualified to make that call.
Red flags worth walking away from: uninsured trades, a scope so vague it can’t be priced properly, and anyone promising an exemption before they’ve physically inspected the wall.
Practical trade-offs in an open plan conversion
Most cost blowouts trace back to two things: a wall that turned out to be load-bearing when nobody checked early, and services that had to move when they could have stayed put. Keeping the sink near its original plumbing stack, where the layout allows it, routinely saves more than the design compromise costs you in flexibility.
Early LBP involvement is the cheapest insurance in the entire project. A site visit before you commit to a layout costs a fraction of what a mid-project redesign costs once demolition has already started and a beam turns out to be non-negotiable.
That’s the thinking behind how Sorted Home Solutions runs these jobs: one point of contact managing the LBP, the engineer, and the trades, with a fixed-fee quote agreed before work starts rather than a moving target.
— Rudi
Get a fixed-fee quote for your kitchen conversion
Some companies offer an alternative to juggling separate quotes from an LBP, an engineer, a builder, a plumber, and an electrician. One team manages the design, the consent application, and all trades on site, with a fixed-fee quote agreed before the first wall comes down.

A site visit is where this starts. Someone qualified looks at your wall, tells you honestly whether you’re looking at an exempt job or a consented one, and prices the scope accordingly rather than guessing on a walkthrough. Kitchen conversions are quoted under the Kitchen Grade A, B, and C packages, scaled to how much structural and service work your layout actually needs, and the same team handles everything from the LBP paperwork through to the final coat of paint. If your project touches the whole house rather than just the kitchen, the Full Home Reno & Flood Restoration service covers that broader scope under the same single point of contact. Browse the kitchen gallery for finished examples, or request a site assessment to find out where your wall sits on the consent spectrum.
Where to check the rules yourself
Three sources are worth bookmarking before you sign anything: building.govt.nz’s guidance on exempt building work for Schedule 1 exemptions, the LBP register for checking a practitioner’s licence class, and Auckland Council’s minor structural alterations page for local application steps.
Sources
FAQ
What are the downsides of an open plan kitchen?
The main downsides are noise carrying into living areas, cooking odours reaching soft furnishings, reduced enclosed storage, and kitchen mess being constantly visible. Good ventilation, a butler’s pantry, and acoustic soft finishes address most of these without giving up the open layout.
Are open plan layouts still popular?
Open plan living and dining remains one of the most requested renovations among Auckland homeowners and a feature buyers actively look for. Some homeowners are now pairing open plan living zones with a hidden butler’s pantry or scullery to get openness without losing storage or hiding mess.
What are the downsides of an open plan house overall?
Beyond the kitchen-specific issues, whole-house open plan layouts can lose zoned heating efficiency, reduce acoustic privacy between living areas, and remove wall space needed for storage or artwork. Careful zoning with flooring changes, ceiling details, or sliding screens, an approach also used to keep flexibility in open spaces, helps offset most of these trade-offs.
What is the kitchen work triangle rule?
The work triangle connects the sink, stove, and fridge, and design guidance generally recommends keeping the total distance between roughly 3.7 and 7 metres with no single leg too long. Pair it with a minimum 900mm aisle width, or 1,200mm where the space doubles as a walkway, to keep the layout functional once walls come down.
Do I need a building consent to remove my kitchen wall?
It depends entirely on whether the wall is load-bearing or a bracing element. Non-load-bearing timber-framed walls may be exempt under Schedule 1, but load-bearing, masonry, or bracing walls need a full building consent with an engineer’s design. An LBP site check is the only reliable way to know which category yours falls into.
Recommended
Comments