

15 Year Rule: NZ Bathroom Waterproofing and Pre Tile Checks

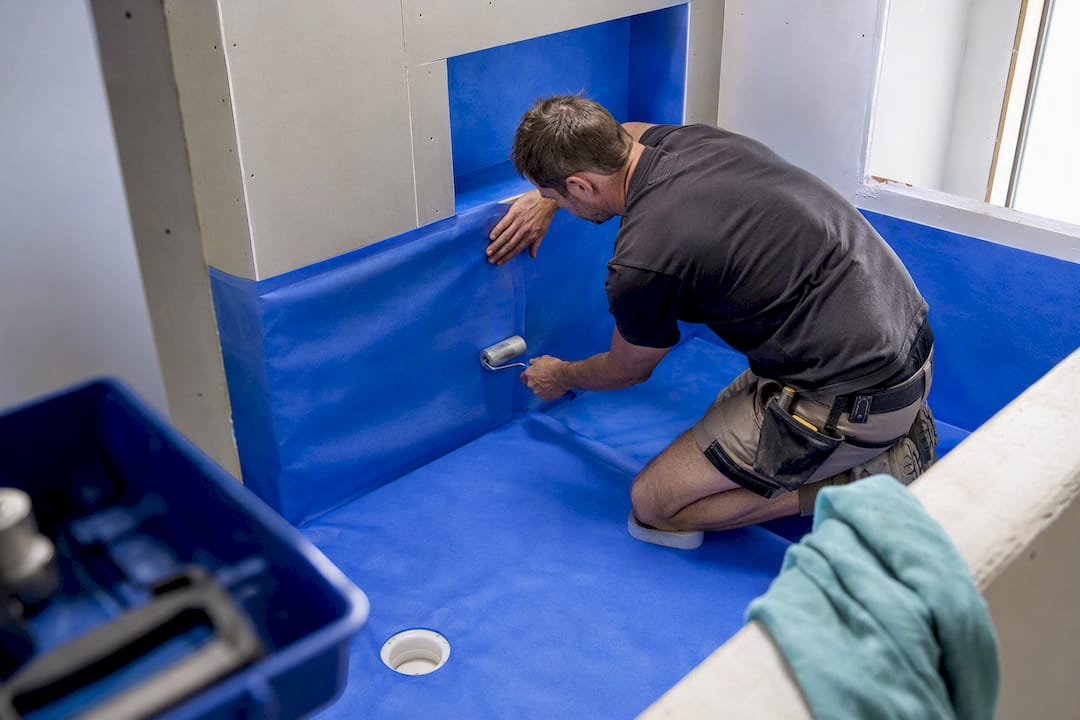
Compliant bathroom waterproofing in New Zealand means meeting Building Code clause E3 for internal moisture and clause B2 for a 15-year durability period on the membrane. The membrane must form a continuous, impervious barrier across floors and up walls around every sanitary fixture, extending to specified heights and radii. Before tiles go down, you should have product data sheets, a BRANZ appraisal reference, and evidence the installer followed the manufacturer’s instructions to the letter.
TL;DR:
Waterproof membranes must have a stated service life of at least 15 years and be installed according to manufacturer instructions with proper documentation.
Waterproofing needs to extend to specific heights on walls and floors, including floor falls of at least 1:50 where no upstand is present, and under all fixtures or cabinetry.
Liquid-applied membranes require two coats and precise thickness verification, with an appraisal or BRANZ reference confirming compliance; sheet membranes are suitable for straightforward areas.
The main failure points are junctions and penetrations, such as floor-to-wall joins and waste collars, making workmanship quality critical over product quality alone.
Most bathroom waterproofing issues stem from installation gaps between trades, so coordinated, monitored projects with proper inspections are essential for compliance.
Table of Contents
What does the NZ Building Code require for bathroom waterproofing?
Clause E3 exists to stop water causing fungal growth, rot, or damage to structure that’s hidden behind tiles for years before anyone notices. The clause sets three practical goals: surfaces in wet areas must be impervious and easy to clean, ventilation must be adequate, and any overflow or watersplash must have somewhere safe to go. E3/AS1 is the Acceptable Solution most bathrooms are built to, and it spells out the dimensions, materials, and detailing that satisfy those goals without needing a specific engineering assessment.
A second Acceptable Solution, E3/AS2, covers alternative membrane systems referenced through the Code of Practice for wet-area membranes. Either pathway is legitimate. What matters is that whichever one your installer follows, the finished product has to pass muster under both E3 and the durability rules in clause B2.
That durability link is often missed. A membrane that technically stops water on day one but degrades within a few years fails the code just as badly as one that leaks from the start. This is why:
Membrane products need a stated service life, not just a warranty sticker.
Acceptable Solutions specify exact heights, falls, and radii, not vague “adequate” waterproofing.
Ventilation and overflow disposal are treated as part of the waterproofing system, not an afterthought.
How far up the walls and floor does waterproofing need to go?
The numbers in E3/AS1 are specific, and they’re the first thing worth checking on any set of bathroom plans. Shower walls need lining that extends to specific heights above the shower floor or shower rose as outlined in E3/AS1. For open showers without a screen, the code defines where waterproofing extends across the floor by a horizontal radius from the shower outlet as specified in the code.
Beyond the shower itself, several smaller measurements catch people out during a renovation:
A minimum upstand is required where no wall or hob already provides the barrier, with exact dimensions set by the building code.
Hobs generally need waterproofing carried a set distance over the top edge, depending on the detail, as specified in the code.
Floors need a minimum fall of 1:50 to the waste where there’s no upstand to contain water.
Membrane has to run under baths, vanities, and any cabinetry sitting near a water supply, not just the visible shower zone.
If your plans or quote don’t mention these figures, ask why. A builder working to code should be able to point to them without hesitation.
Which membrane types meet NZ waterproofing standards?
Three membrane families dominate New Zealand bathrooms: sheet membranes, liquid-applied membranes, and bonded or acrylic systems used under certain tile adhesives. Sheet membranes are pre-formed and taped at joins, which suits straightforward, rectangular wet areas. Liquid-applied membranes are painted or trowelled on and cure into a seamless film, which makes them better suited to awkward junctions, angled walls, and retrofits where a sheet would need too many joins.
Product standards and references worth knowing:
AS/NZS 4858 is the material standard for undertile waterproofing membranes.
The WMAI Code of Practice for Internal Wet-area Membrane Systems governs design, detailing, and installation.
A BRANZ appraisal confirms a specific product has been assessed against NZ conditions.
Ask for the appraisal number before work starts. Many liquid systems need two coats and a minimum wet and dry film thickness to perform, and that requirement sits in the manufacturer’s installation instructions, not in general code text.
How long does bathroom waterproofing need to last?
Clause B2 treats wet-area membranes as a building element with a 15-year durability expectation, which is longer than many cosmetic finishes in the same room. That period isn’t arbitrary. It reflects how long a membrane needs to keep performing before the next fit-out, and it shapes which products a compliant installer can reasonably use.
Tile water absorption is capped at 6% under E3/AS1, though tiles rated at 3% or lower are the safer pick for shower floors and walls.
Adhesives and bedding compounds need to match both the tile and the membrane specification, since mismatched systems can trap moisture rather than shed it.
Timber hobs are a poor choice. Moisture tracks along timber grain and rots the substrate from within, so a solid, waterproofed hob construction is the better long-term option.
Pro Tip: Ask your installer for the membrane manufacturer’s data sheet before tiling starts. If it doesn’t state a durability period or BRANZ appraisal number, that’s a red flag worth chasing before the floor’s covered over.
Where do bathroom waterproofing jobs actually fail?
Industry guidance consistently points to the same conclusion: the membrane material is rarely the problem. It’s the junctions where two surfaces meet that let water through, because that’s where workmanship, not product quality, decides the outcome.
Floor-to-wall junctions need continuous membrane coverage, not a bead of sealant bridging a gap.
Hob-to-wall corners are prone to hairline cracking if the substrate moves slightly after installation.
Waste and drain penetrations require a purpose-made flange or collar, not just membrane painted around a pipe.
Areas behind built-in baths and cabinetry are easy to skip because nobody sees them again once the fixture goes back in.
Tapware penetrations through tiled walls need sealing at the membrane layer, before the tile, not after.
BRANZ has flagged that liquid membranes are frequently applied too thin to meet the manufacturer’s stated film build, which is why a wet-film gauge reading matters more than a visual check. A council pre-tile inspection, where required, is looking for exactly this: continuous coverage at every junction, verified before anything gets covered up.
Do you need a building consent for bathroom waterproofing?
Most bathroom renovations trigger a consent, particularly if you’re moving fixtures, recessing a shower floor, or adding a new sanitary appliance. Some lining and finishing work can fall under Schedule 1 clause 12 exemptions, meaning no consent is required for that specific scope.
Exempt work still has to meet the full Building Code, including E3 and B2, even without council sign-off.
You, as the owner, carry legal responsibility for the finished work meeting code, exemption or not.
Structural changes, moved drainage, or added fixtures usually push a job back into consent territory.
Engage a licensed building practitioner (LBP), a certifying plumber, or a designer early if your renovation touches structure, drainage, or waterproofing extents, since some waterproofing work now sits under a dedicated licence class referenced in BRANZ guidance.
Treating “exempt” as “no rules apply” is the single most common misunderstanding homeowners run into during a bathroom refit.
How can you verify your bathroom waterproofing is compliant?
Documentation is what separates a compliant bathroom from one that merely looks finished. Before tiling starts, you should be collecting paperwork, not just admiring tile samples.
Request product data sheets, the BRANZ appraisal reference, and the manufacturer’s installation guide for the membrane used.
Ask for a record of work or certificate of work covering the waterproofing stage specifically, along with photos of the membrane at every junction.
On site, confirm the membrane looks continuous at floor-to-wall junctions, that wet-film gauge readings were taken and recorded, and that falls run correctly to the waste.
Pro Tip: If any of this is missing when the tiler’s ready to start, pause the job. A pre-tile inspection or LBP sign-off costs far less than pulling up tiles later to fix a hidden leak.
Why managed waterproofing avoids the gaps between trades
Most waterproofing failures happen at the handover point between trades, not inside any one person’s work. A plumber roughs in the waste, a builder frames the hob, a waterproofer applies the membrane, and a tiler covers it, often on different days with different site visits. Sortedhomesolutions coordinates that sequence under one project manager, so the pre-tile inspection happens before anyone’s covering evidence, and the paperwork trail stays intact from consent through to certificate.
— Rudi
Get a documented, compliant bathroom waterproofing job
There are ways to manage a bathroom renovation yourself, juggling a waterproofer, tiler, and plumber on separate contracts. Sortedhomesolutions removes that coordination risk entirely by running the whole job, waterproofing included, under one team and one point of contact.
Our process covers pre-design compliance checks, consent handling where your renovation needs it, licensed trades for the waterproofing itself, a documented pre-tile inspection, and full handover paperwork including manufacturer-verified installation records. You get one person to call if anything needs attention later, not three separate contractors pointing at each other. Explore our bathroom renovation packages or check current pricing for a fixed-fee quote, and get in touch through our enquiry page to start the conversation about your bathroom.
Where to read the official rules
For primary evidence, read E3/AS1 and the E3 guidance documents direct from Building Performance, the Code of Practice for Internal Wet-area Membrane Systems, and BRANZ’s technical notes on membrane thickness. For consent questions, check Can I Build It and our own guide to building consent exemptions.
Sources
Recommended
Comments